Animated QR data transfer with Gomobile and Gopherjs
TL;DR: a weekend project for transferring data via animated QR codes, written in Go and using fountain erasure codes. The Go code is reused for mobile apps using Gomobile, and in a web application for automating testing QR codes parameters, built with GopherJS and Vecty framework.

I’ll share my experience building it, some code and benchmark results of using animated QR as a data transfer method.
The problem
One day I was trying to find a viable solution for the following scenario:
Imagine you’re in the crowded place and suddenly your messenger stop working because your authoritarian government blocked it. Maybe they just banned IP addresses of bootnodes for the messenger, or restricted access to some hosts via state-controlled DNS providers, or cut off yet another VPN or proxy service – it doesn’t actually relevant here. The question is – how to re-enable connectivity if at least one device has a working connection and willing to share connectivity information with others.
Now, that’s rather a long introduction, but one important concept has to be understood here – percolation threshold. The simplified idea is that if you connect nodes in lattice or graph (or people in the crowd) with probability p, then at some critical probability p0 large clusters and long-range connectivity will appear. In even simpler words, if everyone in a crowd will share information with n people around them, you can guarantee with mathematical precision that everyone will get this information.
In the case of bootnodes IPs, for example, that means, that connectivity of the app will be restored for everyone.
Ok, now the question – how do you quickly send an arbitrary piece of small data from one app to another, when you’re in the adversarial environment, with the partly blocked internet? Bluetooth comes to mind first, but that requires a long and tedious process of discovering the device, figuring out its device name, and in many cases, it just “doesn’t connect, don’t know why” type of problems. Next, NFC is a good idea – just tap one phone to another – but the major drawback is that there are still plenty of phones and tablets out there without or with limited NFC support. How about QR codes?
QR Codes
QR codes are an extremely popular type of visual encoding, widely adopted across many industries. It allows for different error recovery levels, with almost 30% redundancy for the highest one. Version with the highest capacity (QR Version 40) allows you to encode up to 4296 alphanumeric or 2953 binary symbols.
But here are two obvious problems:
- 3-4KB might be just not enough
- The more data in QR code, the better quality and image resolution should be
For my case I wanted to be able to transfer approximately ~15KB of data on the average consumer devices, so I naturally asked why not use animated QR codes with dynamic FPS and size changes?
A quick research of prior work showed a few similar projects, mostly as hackathon projects or even as a bachelor’s thesis and written in Java, Python or JavaScript. That means the code is not cross-platform and virtually non-reusable and has to be reimplemented from scratch. Luckily, due to the massive popularity of QR codes, there is no shortage of libraries to work with them, and QR decoding is even embedded in the camera software of major smartphones manufacturers. (That’s actually was one of the reasons of not exploring other ways to increase the capacity of QR code, like colored QR codes, where color encodes additional layers or even cooler stuff with luminance encoding like Apple uses for their particle cloud in Apple Watch pairing process).
TXQR
So that’s how my weekend project started. Name TxQR stands for Transfer (Tx) via QR codes.
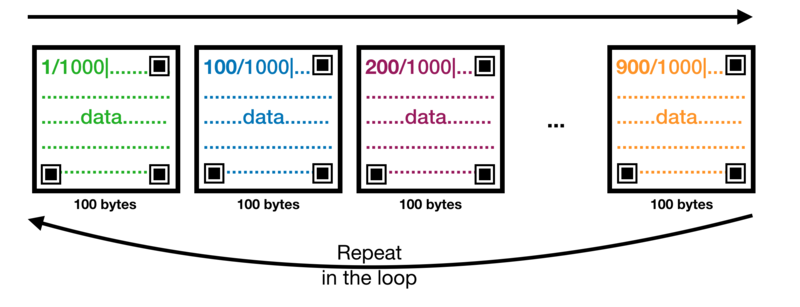
The basic design is following. One client chooses the data to be sent, generates animated QR code and shows it in the loop until the reader receives all the frames. Encoding is designed in such a way, that it allows for any particular order of frames, as well as dynamic changes in FPS or encoded chunks size. That was made for the case where the reader is much slower, and it can display a message “please decrease FPS on sender”, and continue receiving the same file, even if the frame size has changed.
The protocol is quite simple – each frame starts with a prefix “NUM/TOTAL|”, (where NUM and TOTAL are integer values for current and total frames respectively) and the rest is the file content. For binary content, original data is encoded using Base64, so only alphanumeric data is actually encoded in QR. Then frames are shown with a given FPS in the infinite loop.
It’s that simple, and here is a Go implementation of the protocol, along with convenient wrappers for encoding and decoding QR codes. The cool part was to make a mobile app that can use this code.
UPD: txqr now uses much more efficient approach using fountain codes. See the follow-up article with detailed description and results comparison.
Gomobile
And it was an extremely easy task thanks to gomobile.
You just write a standard Go code, then run gomobile bind ... and in a few seconds get prepared .framework or .aar file to be included in your iOS or Android project. In the project, you refer to it as to any regular library and get autocomplete and type information automatically.
I quickly built a simple iOS QR scanner in Swift (thanks to the fantastic intro on that by Simon Ng) and modified it to read animated QR codes, feed the decoded chunks into txqr decoder and display received the file in a preview window.
Whenever I got stuck on “how to do X properly in Swift”, it usually was much easier to implement it in Go and then just call the method from lib. Don’t get me wrong, Swift is a nice language in many aspects, but it allows you to things in multiple ways plus has some breaking changes history, and you end up googling and stackoverflowing for an hour for simple things like “how to measure duration with millisecond precision”. After 40 minutes of wasted time, I just did Go function with time.Since(start) call and used it from within the Swift.
I also wrote a terminal tool that displays QR codes in the console for quickly testing the app. Combined, that worked suprisingly well - I was able to send the small image in approximately ten seconds, but once I started to test on bigger files and playing with different FPS, I realized that terminal QR implementation frame rate wasn’t enough to test higher rates and that trying it manually is a dead end.
TXQR Tester
If I want to find the optimal combination of FPS, QR frame size and QR recovery level I have to run at least 1000 tests, manually changing parameters and writing down results to the spreadsheets, while holding the phone near the screen. No way. I obviously should be able to automate that!
That’s where the idea of txqr tester app came in. First, I decided to use x/exp/shiny which is a UI framework for desktop apps in Go, but it seems to as experimental as it is abandoned. That’s a pity as I played with shiny a year ago and it was promising for low-level desktop apps. When I tried it today, it didn’t even compile. It seems like there is no incentive to develop desktop UI frameworks anymore – everything is on the web.
But web programming, you know, is still in the very early stages – programming languages just started to be supported by browsers via WASM, but they’re just making their first baby steps. There is, of course, JavaScript, but friends don’t let friends write web apps in JavaScript, so I decided to use one recent discovery of mine - framework Vecty, which allows you to write frontends in Go and automagically transpile it to JS via surprisingly mature project GopherJS.
Vecty and GopherJS
![]()
Honestly, I never had more fun writing frontends.
I’ll blog more about my recent experience with Vecty, including developing WebGL apps, but the point is – after writing quite a few projects in React, Angulars and Ember, doing it in a well-designed language is such a breath of fresh air! I can now write pretty decent web apps without writing any single line of Javascript, and, in most cases, “it just works”!
Just to tease you, here is how you write a web app in Go these days:
package main

import (
    "github.com/gopherjs/vecty"
)

func main() {
    app := NewApp()

    vecty.SetTitle("My App")
    vecty.AddStylesheet(/* ... add your css... */)
    vecty.RenderBody(app)
}
The app is just a type – a struct that embeds vecty.Core type – and it has to implement vecty.Component interface. That’s it! Constructing DOM objects seems a bit verbose at start, but you fully appreciate how actually great it is only when start refactoring the code:
// App is a top-level app component.
type App struct {
    vecty.Core

    session      *Session
    settings     *Settings
    // any other stuff you need,
    // it's just a struct
}

// Render implements the vecty.Component interface.
func (a *App) Render() vecty.ComponentOrHTML {
    return elem.Body(
        a.header(),
        elem.Div(
            vecty.Markup(
                vecty.Class("columns"),
            ),
            // Left half
            elem.Div(
                vecty.Markup(
                    vecty.Class("column", "is-half"),
                ),
                elem.Div(a.QR()), // QR display zone
            ),
            // Right half
            elem.Div(
                vecty.Markup(
                    vecty.Class("column", "is-half"),
                ),
                vecty.If(!a.session.Started(), elem.Div(
                    a.settings,
                )),
                vecty.If(a.session.Started(), elem.Div(
                    a.resultsTable,
                )),
            ),
        ),
        vecty.Markup(
            event.KeyDown(a.KeyListener),
        ),
    )
}
You’re probably looking at this code and thinking how verbose it is, and it definitely is, but it’s so pleasant to work with! No open/closing tags, super easy copy/paste operation (if you need to move some DOM nodes around), the structure is clear and makes sense, and it’s all strongly typed! You’ll appreciate its verbosity after writing your own components, I’m quite sure.
Vecty is said to be a React-like framework, but it’s not completely accurate. There are GopherjS bindings to React exists - myitcv.io/react, but I don’t think we need to follow the same steps as React did. When you write frontend in Vecty, you realize how much simpler things are. You don’t need most of the hidden magic and new terms that most JavaScript frameworks invent – they’re all just accidental complexity. You still just need types and functions and methods and connect and call them properly, that’s it.
For the CSS I used surprisingly good CSS framework called Bulma - it has some sane and meaningful naming, making resulting UI code really digestible.
The real magic happens on the compilation stage, though. You just run gopherjs build, and in less than a second, you got your compiled JS ready to be included in your page or server by your server. When I first run it, I expected to see a bunch of errors, warnings, unreadable messages, but no - it’s blazingly fast, silent and only reports compilation errors as oneliners. In the browsers, by the way, if panic is thrown, you see stacktraces with references to Go files (not the transpiled JS) and line numbers in it. Isn’t it cool?
Testing the TXQR encoder parameters
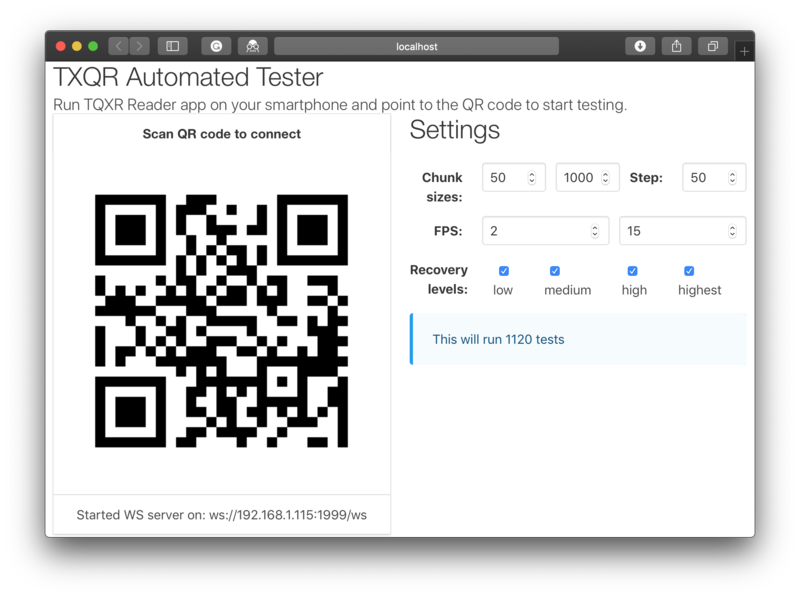
So, in a few hours, I got the web app that allows me to configure the range of testing parameters:
- FPS (frame per second)
- QR frame size (how many bytes to put in each QR frame)
- QR Recovery level (Low, Medium, High and/or Highest)
and initiate a testing sequence for the mobile app.
The mobile app, of course, should be automated as well – it needs to understand when the next testing round starts, handle timeouts (sometimes phone camera just can’t pick up all frames and never get the result), sends results to the app, etc.
There was a tricky part with the fact that web app can’t create listening sockets – it runs in the browsers, and apart of WebRTC (which I thought would be an overkill) for such a simple communication testing protocol, you only can be a client.
So the solution was quite simple – small Go app that will serve as an HTTP static server for web app (and automatically spin up the browser for you), will also include WebSocket proxy which will expect only two connections – from UI (our web app) and from mobile phone - and that will act like a transparent proxy, so both clients think they talk to each other directly. They have to be on the same WiFi network, of course.
There still a need to somehow communicate WebSocket address to the mobile app, and guess what – we can use QR code for that :) So the flow is following:
- mobile app looks for QR code with “start” marker
- from the marker, it extracts “ws://” URL and connects to the given server
- UI app immediately recognizes this and starts generating next QR testing round
- it shows new QR code with “readyToStart?” marker
- the mobile app reads this QR code and sends the WebSocket message with a confirmation
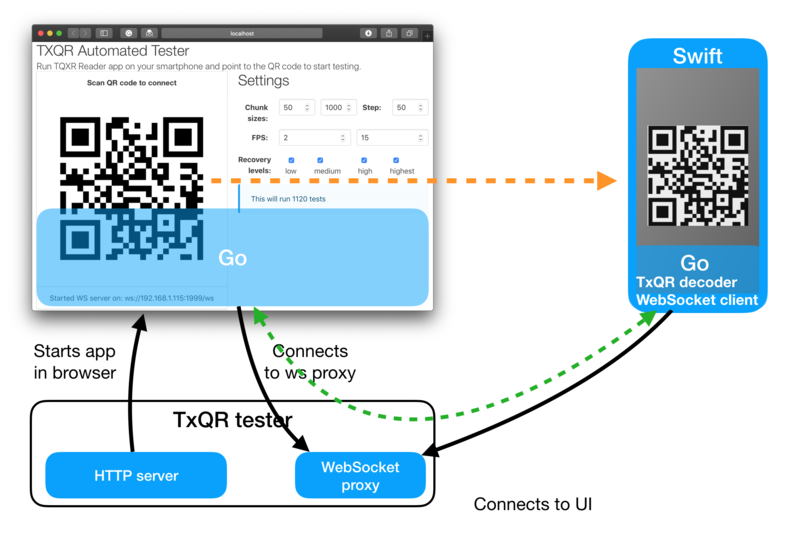
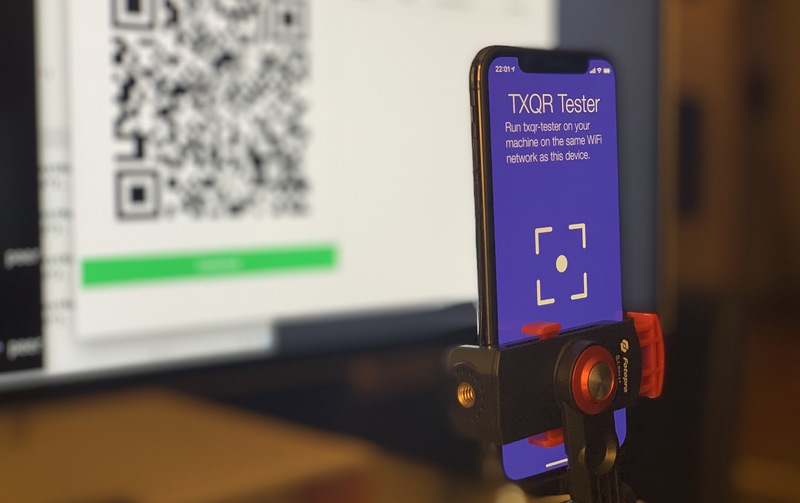
So, in the end, I just have to put the mobile phone on the tripod, and let it talk to the app via scanning QR codes and send messages via WebSocket.

At the end UI allows to download CSV file with results, that can be analyzed in R or any other statistical tool or language.
Benchmarking
The full testing cycle runs around 4 hours (the heaviest part – generation of animated QR runs in the browser, and as it’s still JS under the hood, it uses only one CPU core), and I had to make sure that the screen doesn’t turn itself off, or some other application window doesn’t cover the testing app. I set up testing with the following parameters:
- FPS - from 3 to 12
- QR frame size - from 100 to 1000 (with step 50)
- QR Recovery Levels - all four
- Data size - 13KB (it’s randomly generated binary bytes)
After a few hours, I downloaded CSV file and did some quick analysis and visualizations.
Results
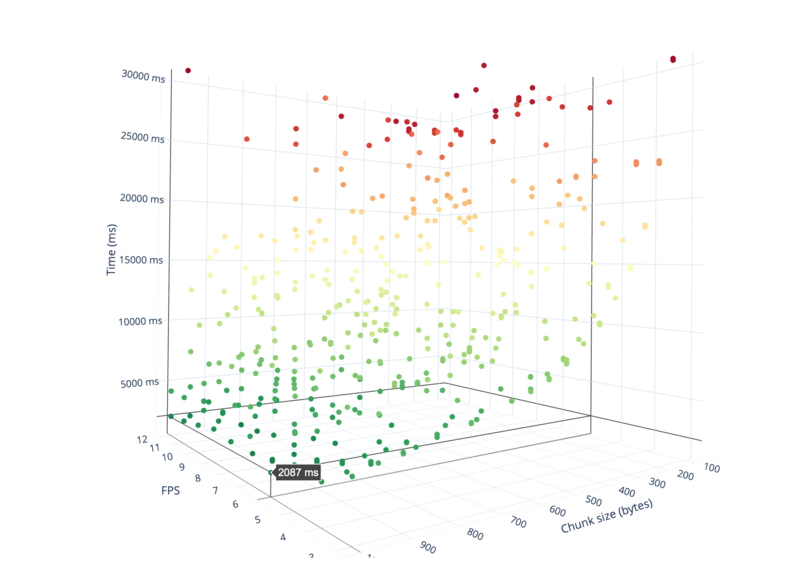
A picture is worth a thousands words, but 3D interactive widgets is worth a thousand pictures. Here is 3D scatterplot for obtained results:
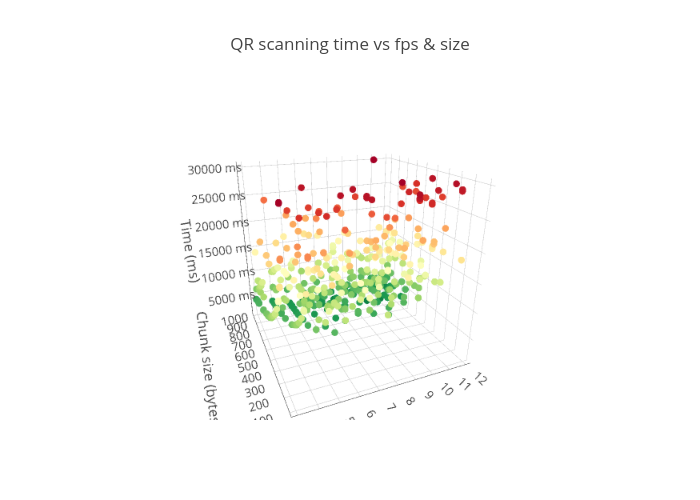
The best result was 1.4 secs, which is almost 9KB/s! This result has been recorded at a rate of 11 frames per second and chunk size of 850 bytes with Medium recovery level. In fact, however, at such encoding ratio and fps the probability of phone camera missing a frame was quite high, so in many cases it was just looping over and over, waiting for the missed frame until the test round timed out.
Here are the boxplots for chunk size and fps variables (note, timed out measurements recorded here as values of 30s):
Time vs Chunk size:
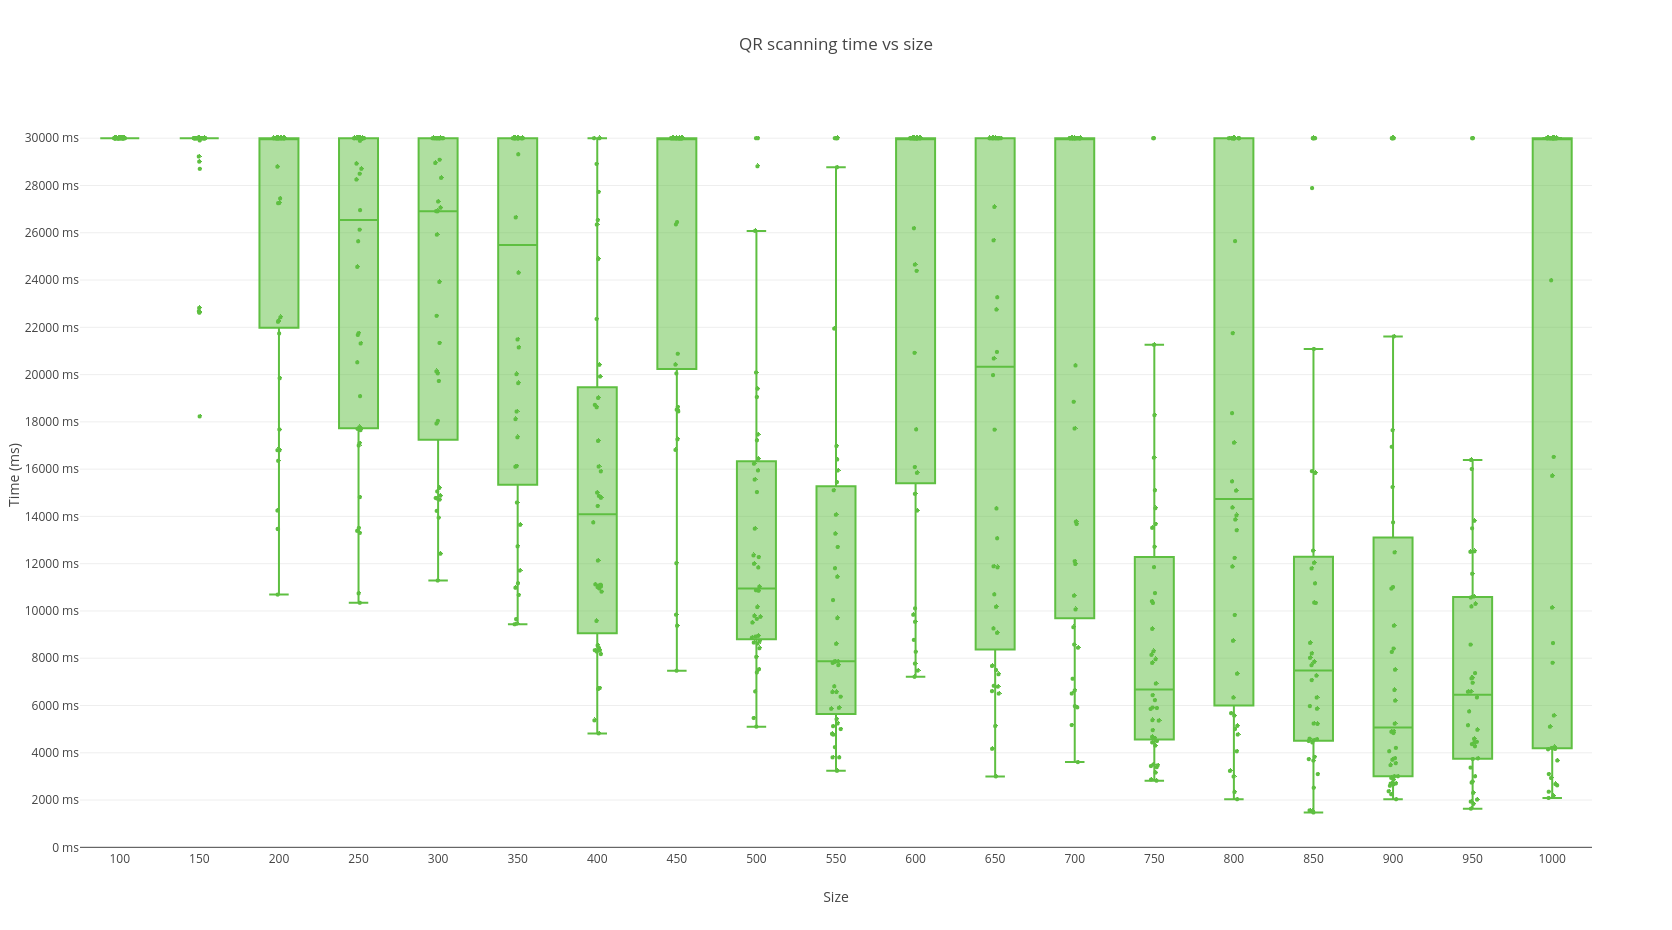
As we can see above, low chunk sizes result in too much overhead for QR encoding and overall transferring time skyrockets. There are some sane values like 550 and 900 bytes per chunk, but step left or right, and we got timeouts due to missed frames again. 1000 bytes size is almost guaranteed miss of frames and timeout.
Time vs FPS:

FPS parameter, a bit to my surprise, didn’t have that much effect. The best values seem to be 6-7 FPS, which equals to approximately 150ms between frames. The lower fps result in increasing wait time, and faster FPS yields missed frames.
Time vs QR Recovery Level:
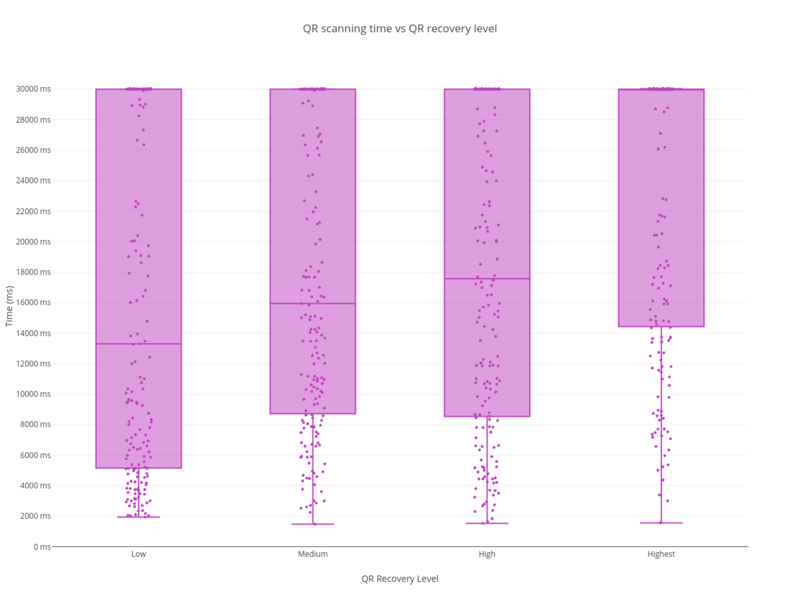
QR Recovery Level parameter showed a clear connection between transferring time and the redundancy level. The clear winner here is Low level (7% redundancy), and there is no surprise – smaller redundancy of data results in more readable and smaller QR codes, which are easier to scan and faster to process. For data transfer purpose we probably don’t need much redundancy at all. So safe values should be either Medium or Low.
Now, those test rounds should probably be run hundreds of times more, on different screens and different devices, to make more adequate conclusions. But for my weekend exploring that was more than enough.
Conclusion
This fun project proved to me that it’s definitely possible to add unidirectional data transfer without any network connectivity at all using animated QR codes. While maximum data transfer rate was around 9KB/s, in the vast majority of cases you can expect more modest rates – 1-2KB/s.
I also had incredibly great and productive experience with both Gomobile and Gopherjs (with Vecty) – they practically become my usual daily tools. They’re mature, fast and gives you “it just works” experience.
Last, but not least, I’m still amazed at how productive you can be with Go, once you know what you’re going to build – extra short edit-run loop time boosts experimentation, simple code and no class-hierarchies madness makes refactoring easy and nice chore, and cross-platform mindset allows you to reuse the same code in a server, in a web app and in a mobile apps at the same time. There is also still plenty of room for the optimization and speedups, as I mostly did things in the most straightforward way.
So if you have never tried gomobile or gopherjs – I encourage you to try it on the next opportunity. It’ll take an hour of your time to start playing with, but could open a whole new world of web or mobile development with Go. Give it a try!
Links
- https://github.com/divan/txqr
- https://github.com/divan/txqr/tree/master/cmd/txqr-tester
- https://github.com/divan/txqr-tester-ios
- https://github.com/divan/txqr-reader
- https://github.com/gopherjs/vecty
- https://github.com/golang/mobile
Update
UPD: txqr now uses much more efficient approach using fountain codes. See the follow-up article with detailed description and results comparison.