Creating WebGL apps with Go
TL;DR In this article I’ll share my experience building an interactive 3D WebGL-based application for peer-to-peer messaging protocol simulation without writing any single line in JS. You’ll learn how GopherJS and Vecty framework can dramatically lower the complexity of building WebGL-enabled web apps in Go.
It’s often said “A picture is worth a thousand words”, but in the era of high-DPI screens and big data, the new idiom is now truer – “3D interactive visualization is worth a thousand pictures”.
Third dimension and interactivity can add exponentially more to the picture or story you want to show to your users, readers or clients. A single look at the data in 3 dimensions in a split of a second can tell you more than a 30-page report.
However, in 2018 it’s still prohibitively hard to build interactive 3D visualizations. For some common use cases such as statistical analysis of large datasets, there are tools such as Plotly Chart Studio exists. But once you find yourself looking for the non-common case, you have only two options – write it yourself or drop the idea. Very often we choose the latter.
Of course, 3D engines and frameworks aren’t a new thing in software engineering – they’ve been there since the rise of personal computers. And nowadays, every computer has a powerful GPU unit, and every OS ships with its own API for the native 3D graphics. But if you want to share your 3D graphics with people around the world, you have to use web platform and display it in the browser. And that essentially locks you into one particular language – JavaScript, and one particular 3D engine – WebGL.
And that’s where the problems start to pile up. JavaScript ecosystem is notorious for often breaking API, JS fatigue, outdated documentation and bunch of other problems. It’s just hard to write long-term maintainable code, especially if you have a background in strongly typed languages.
Go, on the other hand, is famous for its simplicity, readability and performance. Wouldn’t it be nice to write 3D with WebGL in Go?
But, first, let’s do a quick recap of what’s WebGL and how does it really work.
WebGL
WebGL is a rasterization engine – a relatively tiny layer between the GPU and user’s JS code. It takes control code in JavaScript and GLSL (OpenGL Shader Language) and draws lines, points and triangles using your OS capacity to talk to GPU. In order to work, WebGL must be implemented by the browser, and, luckily, all major browsers already do support it.
On top of WebGL there are third-party libraries and frameworks exist – like Three.js, Babylon.js or A-Frame. They abstract many of the complexities of working with raw shader code, points and triangles, and provide higher-level tools like “material”, “mesh”, “geometry”, “camera”, “light” etc.
The most popular library is probably Three.js, and it has really nice and clean API. I would love to have something similar in Go. Maybe we can use GopherJS to automatically transpile Go code into JS?
GopherJS
GopherJS is incredible. Seriously.
When I first heard about Go-to-JS compiler a few years ago, my first reaction was “cool, but it’s unlikely to change anything”. Later, on dotGo 2016 conference in Paris, one of the GopherJS developers, and now a member of the Go team, Dmitry Shuravlyov gave a fascinating talk about GopherJS - go watch it, even if it’s 2 years old. When you realize that even the networking code like net/http just works and you can send AJAX-queries by calling Go’s http.Get(), you start realizing the power of this piece of technology.
A lot of already written Go code can be immediately available for use in the browser in a few seconds. Many JS libraries – like React, Angular, VueJS, D3, jQuery etc – already have bindings for GopherJS, and it’s usually easy to create custom bindings for the JS library you really need. In most cases, you may implement bindings just for a subset you need.
Installation is really simple, just run go get -u github.com/gopherjs/gopherjs:
Building our first WebGL app in Go
So how can we create a web app with GopherJS and Three.js? We’ll need bindings for Three.js first.
I found a proof-of-concept package https://github.com/Lngramos/three that implemented most basic bindings to three.js. One of the design goals seems to provide the same API in Go, as the JS version. In the process, I started changing it at a faster pace than the original author’s PR reviewing pace, so I ended up using my forked version with the same name. While the current version works well for my needs, it’s really far from being even 10% complete, and the more I work with it, the more I want to refactor it from scratch. The problem is that Three.js exploits inheritance and some interesting properties, so to speak, of JavaScript type system, so it doesn’t map well to Go. So as I accumulate more experience working with it, the new design will probably come up.
Compare JS and Go usage of three.js.
JS:
var scene, renderer, light, camera;
camera = new THREE.PerspectiveCamera(70, w/h, 1, 1000 );
camera.position.set( 1000, 50, 1500 );
scene = new THREE.Scene();
renderer = new THREE.WebGLRenderer();
renderer.setSize(w, h);
light = new THREE.AmbientLight( 0xffffff );
scene.add(light);
Go:
camera := three.NewPerspectiveCamera(70, w/h, 1, 1000)
camera.Position.Set(1000, 50, 1500)
scene := three.NewScene()
renderer := three.NewWebGLRenderer()
renderer.SetSize(w, h, true)
light := three.NewAmbientlLight(three.NewColor("white"))
scene.Add(light)
The similarity is so striking that it’s probably feasible to write a static-analysis tool that will convert Three.js based code into Go code automatically!
Three.js Hello, World in Go
Now, let’s create the new project:
mkdir $(go env GOPATH)/src/github.com/divan/go-webgl-example
cd $(go env GOPATH)/src/github.com/divan/go-webgl-example
And create two files – main.go and index.html, which we will use to start our app in the browser:
index.html doesn’t nothing more than just defining a single canvas tag, which will be used for WebGL rendering, and including three.js code with our GopheJS-generated go-webgl-example.js code:
<!DOCTYPE html>
<html>
    <head>
        <meta charset=utf-8>
        <title>Go WebGL app</title>
        <style>
            body { margin: 0; }
            canvas { width: 100%; height: 100% }
        </style>
    </head>
    <body>
        <script src="https://cdnjs.cloudflare.com/ajax/libs/three.js/99/three.min.js"></script>
        <script src="go-webgl-example.js"></script>
    </body>
</html>
main.go is responsible for the high-level logic of our 3D app – setting up the scene, the camera, lights, objects, and handling animations and user interaction:
package main

import (
    "github.com/divan/three"
    "github.com/gopherjs/gopherjs/js"
)

func main() {
    width := js.Global.Get("innerWidth").Float()
    height := js.Global.Get("innerHeight").Float()

    renderer := three.NewWebGLRenderer()
    renderer.SetSize(width, height, true)
    js.Global.Get("document").Get("body").Call("appendChild", renderer.Get("domElement"))

    // setup camera and scene
    camera := three.NewPerspectiveCamera(70, width/height, 1, 1000)
    camera.Position.Set(0, 0, 500)

    scene := three.NewScene()

    // lights
    light := three.NewDirectionalLight(three.NewColor("white"), 1)
    light.Position.Set(0, 256, 256)
    scene.Add(light)

    // material
    params := three.NewMaterialParameters()
    params.Color = three.NewColor("blue")
    mat := three.NewMeshLambertMaterial(params)

    // cube object
    geom := three.NewBoxGeometry(&three.BoxGeometryParameters{
        Width:  200,
        Height: 200,
        Depth:  200,
    })
    mesh := three.NewMesh(geom, mat)
    scene.Add(mesh)

    // start animation
    var animate func()
    animate = func() {
        js.Global.Call("requestAnimationFrame", animate)
        mesh.Rotation.Set("y", mesh.Rotation.Get("y").Float()+0.01)
        renderer.Render(scene, camera)
    }
    animate()
}
All you have to do now is just run:
gopherjs build
and in a split of a second, it’ll generate two files - go-webgl-example.js and go-webgl-example.js.map in the current directory.
Next, point your browser to the index.html file in the current directory, and you should see this:
This example is not quite impressive, plus it’s not structured well – everything is in one function, and even animate callback had to be implemented as closure to avoid making common variables, such as camera or renderer global ones.
For real applications we would want to have a much more flexible structure, ability to abstract things into different types and sub-packages, refactor it easily, write tests for logic, etc. We also need something more than just WebGL canvas – probably some introduction text, input controls for animation parameters, ability to upload files with data, etc. But, wait, for that we need DOM manipulation, and write code in HTML and CSS, and use popular JS frameworks. Luckily, there is as a fantastic framework exists that allows you to write web components in pure Go. It’s called Vecty, is obviously based on GopherJS, is quite mature and it’s fantastic.
Vecty – write your next frontend in Go

Vecty is a library for GopherJS that allows you to build frontend apps using high-level components (or widgets) and providing the abstraction layer over DOM and many browser’s JS APIs. In a way, it’s similar to React (and even advertised as a React-like library), but I’m happy to disagree with this – it is way simpler and much more pleasant to work with.
The basic concept in Vecty is the Component interface - any type implementing it can represent a visual component within a Vecty application. To define new Component, you simply create a type that embeds vecty.Core and implement Render() method.
page.go
package main

import (
    "github.com/gopherjs/vecty"
    "github.com/gopherjs/vecty/elem"
)

// Page is a top-level app component.
type Page struct {
    vecty.Core
    article string
}

// Render implements vecty.Component for Page.
func (p *Page) Render() vecty.ComponentOrHTML {
    return elem.Body(
        elem.Div(
            elem.Heading1(
                vecty.Text(p.article),
            ),
        ),
    )
}
Don’t be scared by those verbose lines in Render() method. As soon as you start building DOM tree that way you realize how incredibly useful it is: no open/closing tags, super easy copy/paste operation (if you need to move some DOM nodes around), the structure is clear and makes sense, and it’s all strongly typed!
main.go
package main

import "github.com/gopherjs/vecty"

func main() {
    page := &Page{article: "Creating WebGL apps with Go",}
    vecty.SetTitle("Hello world")
    vecty.AddStylesheet(/* ... add your css... */)
    vecty.RenderBody(page)
}
Run gopherjs build and open index.html:
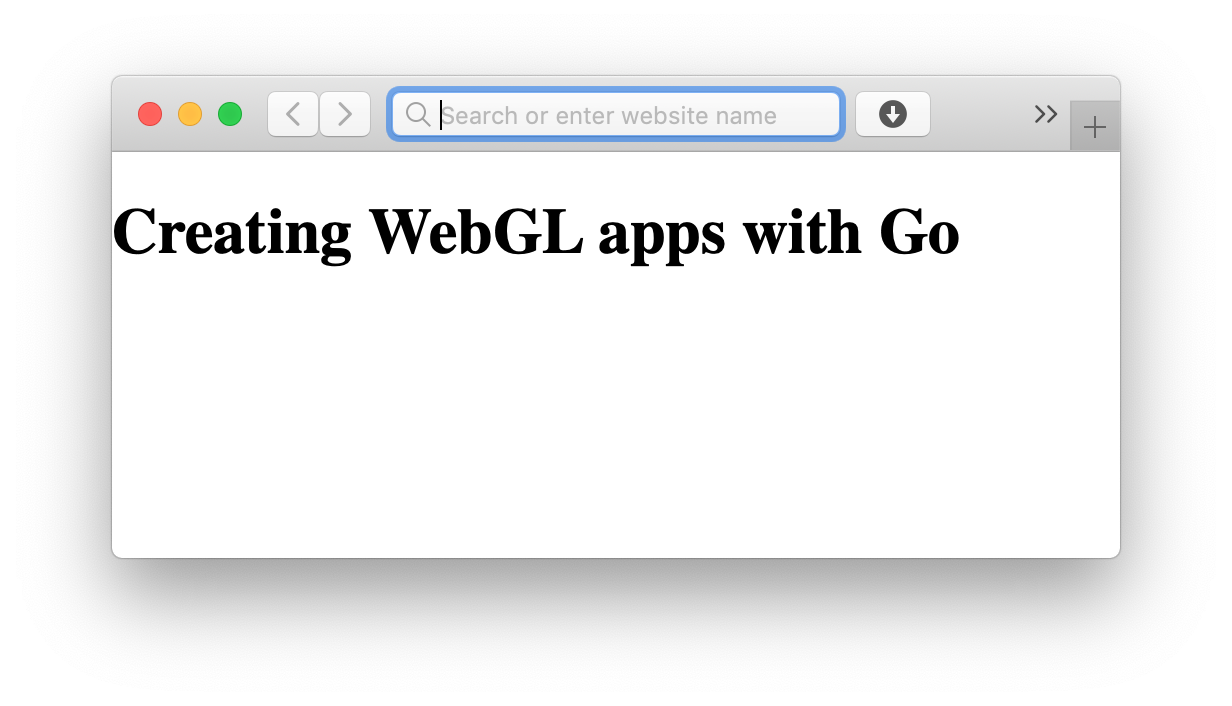
The most impressive thing with this basic example is how much simpler everything seems to be comparing to frontend development in the traditional way:
- there is no need for project bootstrap generators (like
yo) that generate tons of files just for the empty file - there are no overcomplicated building tools that require you to read books on how to use them – build pipeline is crazy fast and simple (and you always have
go generateat your service for the rest) - a magic-free code – it’s just an ordinary Go code, you can understand every single part of it just by reading it
- it is strongly typed – in practice, you will almost never see errors in browser’s console, but when you do, it’ll show you stack traces with .go files and line numbers
Now, Vecty is positioning itself as an experimental work-in-progress project, which it definitely is, but from my experience, it’s already more than useful for writing relatively decent small web apps.
I wrote a few apps with it already, and I never had more fun writing frontends!
So I want to share with you my experience building web app for p2p-messaging protocol visualization in pure Go, using Vecty and three.js bindings.
P2P messaging visualization
Problem
I’ve been working recently on peer-to-peer messaging protocol for Ethereum network, called Whisper (not to be confused with Signal’s Open Whisper Systems or Whisper media platform), and there was one problem – most people don’t have intuition about message propagation in p2p-networks. We’re so used to the centralized systems, that all our understanding of scales, timings, limits and weak points are based purely on the hierarchical topologies and client-server model.
And there is no wonder – to understand the behaviour of the complex network system, we need data, and for data, we collect metrics. Peer-to-peer networks are often used and designed to combat issues that centralization creates, and centralized data collection is one of them. So generally we don’t have metrics and data in large-scale p2p-network, which is good for the security of those systems, but bad for developers’ understanding of its behaviour.
So the obvious solution is to use network simulation software like OMNET++ or PeerSim, but in order to use it with custom p2p protocol code, that should have been ported first to C++ to use with those libraries. In the case of Whisper protocol, it’s written in Go, as a part of go-ethereum package, and the complexity and usefulness of the task was daunting. I wanted to have a simulator, where I can change algorithm or tune parameters, and in a couple of minutes see changes visualized and collect data from the simulator.
And that was the idea – to build a simulator, network graph visualization in 3D, collect data and visualize message propagation, add interactivity to the interface, where I could choose different networks, choose simulation parameters, replay simulation and analyze stats.
For that, I needed to code a frontend app with 3D visualization, write a simulator that can use an existing Go code and connect them. Most of the work had to be on the frontend part.
So that’s where I decided to combine my experiments with GopherJS and WebGL, and to give Vecty a try.
UI and widgets
The first thing you realize is that you’ll have to write your own widgets. Luckily there are no special rules for that – just create your widgets as types in separate .go files, and move them into the separate package when it makes sense.
The whole UI for the app consisted from sidebar with a bunch of configuration selectors and file uploads handling, and three tabs with different screens – first one is WebGL canvas with visualization.
Each widget is just a Vecty component, created and rendered from within the other component. You specify the layout, classes, CSS styles right there in Render() method. Here is a code for a network selector widget with custom upload option, for example:
// Render implements the vecty.Component interface for NetworkSelector.
func (n *NetworkSelector) Render() vecty.ComponentOrHTML {
    return Widget(
        Header("Network graph:"),
        elem.Div(
            vecty.Markup(
                vecty.Class("select", "is-fullwidth"),
                event.Change(n.onChange),
            ),
            elem.Select(
                vecty.Markup(
                    event.Change(n.onChange),
                ),
                n.networkOptions(),
                elem.Option(
                    vecty.Markup(
                        vecty.Property("value", "upload"),
                        vecty.Property("selected", n.isCustom),
                    ),
                    vecty.Text("Upload custom..."),
                ),
            ),
        ),
        n.descriptionBlock(),
        vecty.If(n.isCustom, n.upload),
    )
}
There are a few interesting things to note here:
- style and classes (markup) should be inside the
vecty.Markupfunction vecty/eventpackage provides handlers for most DOM events, and you just have to provide function or method in a callback fashion- whenever you want to replace verbose parts with something more descriptive, it’s easy just to make a new function with the code, and simply call it from Render – like
n.descriptionBlock()orn.networkOptions() - for conditional rendering, Vecty offers to nice helpers -
vecty.If()andvecty.MarkupIf(), which allows you to build pretty advanced presentation logic of your components
For CSS I’ve chosen surprisingly good framework called Bulma, but you can use whatever framework you prefer, like Bootstrap or Material Design.
Force-directed graphs
Another essential part of the app was the ability to render the network graphs. Traditionally, such graphs are drawn using force-directed graph algorithm. The idea is simple:
- place all network nodes in 3D space pseudo-randomly
- apply repelling force between nodes (each node repels from each)
- apply spring-like force between nodes that have links (when the distance is closer than some value L, nodes repel, and attract otherwise)
- run this in the loop sufficient amount of times, till the system reach stable energy state
My implementation of it is far from perfect and has a lot of space for optimization, but it works fast and accurate enough for my case. For step 2 I use Barne-Hut approximation method to speed up the calculation.
The output of the algorithm is a 3D coordinates for each node. All we have to do now is to render objects and links with the given coordinates via WebGL.
Simulation
Simulation code as well is written in Go, and currently does relatively simple thing: starts in-memory network, launches Whisper nodes (based on the real code), sends a message, and records events like “message received” or “message sent” from each node in the network, and dumps it into special log file, called “propagation log”, which can be analyzed and visualized further.
Simulation part is the heaviest one, so it’s not wise to run it in the browser – despite the goroutines support in GopherJS, the code is still limited by JS engine design and can use only one core in the browser. So this part can be run natively on the server and talk to frontend via the network.
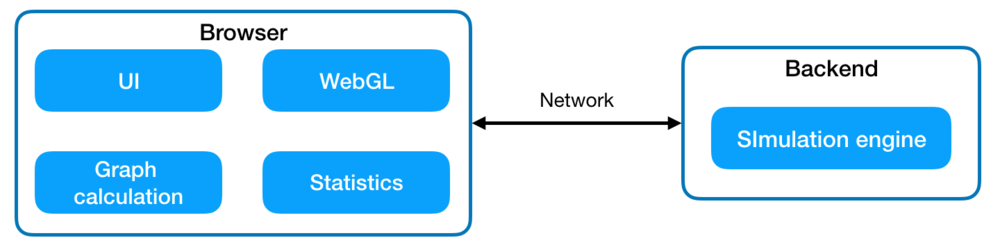
Putting it together
The coolest thing about current setup is that you can choose which part will run in the browser, and which on the backend almost on the fly – it’s the same Go code. For example, in a first attempt, I designed app in a way that physics simulation for force-directed graph was running on the backend, and then sending the result to the browser via WebSocket. But If I wanted to change the simulation parameter or run a single iteration on a keypress, I had to implement it as one more command for WebSocket protocol, and it was tedious. It turned out to be so much simpler just to move this part of code into the browser and call natively from the Vecty keypress handler.
The result, while still being a work in progress, is so much more than I had imagined when I started to work on it.
You can see a demo of the app here:
You can try it right now online as well (without the simulation part):
link to the online app
Conclusions
While main hopes and expectations in the frontend world revolve around WebAssembly and the upcoming possibility to write code for browsers in pretty much every language, GopherJS and Vecty already provide an excellent playground to test out UI framework designs. There is a pending PR into Vecty with WebAssembly support, by the way.
To me, using Go in a web application has a nice property of making typically overly complicated process so much simpler.
- it’s easier to start (compare “hello, world” in Vecty with
create-react-apphelper tool output – it’s 2 files and 592 bytes vs 29890 files and 1MB + 270MB of dependencies) - it’s easier to develop – the only command you have to learn is
gopherjs build, the rest is the same, you can use Go tooling for building, testing, benchmarking, static analysis, etc. - it’s easier to read and write code – Vecty was designed with strong a focus on simplicity and performance, so you will not find new weird concepts, so typical for frontend frameworks. There is no
$scopes, nomapDispatchToProps(dispatch, [props])madness, no implicit magic behind every concept, no breaking changes every single release, no multiple ways to do the same thing and no permanently outdated tutorials. It’s just pure developer’s pleasure to work with.
As I said earlier, that’s the coolest experience with frontend development I ever had.
However, there were drawbacks too:
- Go frontend community is young, and there is no abundance of component libraries. So the most widgets you’ll have to implement yourself. (The good news, of course, is that it’s really easy)
- GopherJS is an incredibly powerful tool, but it’s still JavaScript code in the end, which is being run in the browser’s sandbox, and they have certain restriction and limitations. Inability to use more than 1 CPU core is one of the major ones.
It’s also important to understand, that large-scale web applications (like Gmail-scale) will probably require much more maturity from the Go framework. And Vecty definitely not a production ready replacement for the modern Web development practices. But for many cases where you need small decent frontend apps, it’s actually a great fit already. Just a couple of days ago I’ve read a post where author was building web app for displaying and analyzing graphs of connections between composers. That’s the perfect target audience :)
As for WebGL, ability to use from Go opened a whole new world of possibilities for me, giving the promise of writing well-structured, readable, testable and maintainable apps, that will work in a few years without any changes. It’s good to keep an eye on advancements in 3D graphics for the web like WebGPU, but if you want to write it today, WebGL is a way to go.
And finally, while learning and working with GopherJS, Vecty and three.js bindings, I had a pleasure to one more time realize how incredibly friendly and helpful Go community is. When I just started playing with Vecty and was a bit confused with the proper way to use WebGL canvas from within Vecty, I went straight to the #vecty channel on Gophers’ Slack and humbly asked for advice. The Vecty author, Stephen Gutekanst, not only answered my question in a great detail, but also created and published the library that does exactly what I needed, and thoroughly commented it and explained how to use it.